Finish It Up Friday ~ Hourglass

This was actually my first finish after I got back to Michigan, but I wanted to gift it before sharing.

I freehanded all the quilting, hiding little messages here and there.

It was a healing quilt for me to make. I pray it is for the recipient as well.

Have a great day!

Posted in Finishes 2020, Uncategorized | 11 Comments

Die Cutters Part 2

I shared a bit yesterday about my Accuquilt studio die cutter.

Today I’m going to discuss a big about the differences between the GO! Cutters and my studio cutter. All are made and sold by Accuquilt . Let’s start with the dies.

You can see here that the studio dies are thicker. This is why you can cut ten layers with the studio and only 6 with the GO! dies. See the gray foam on the GO! die? It’s thinner and the blades are shorter. They also have a plastic base. None of these are bad things, just differences.

I do have a few GO! dies. I can use them with my studio cutter using an adapter shown below.

You cannot use studio dies in a GO! cutter.

The GO! dies tend to be less expensive, but there are often great sales on studio dies. There is a bit more variety available in the GO! Dies. There are three types of GO! Cutters. This is the smallest, called the GO! Me.

It comes with a 3″ finished size HST die and a 3″ finished size square die. You can do a lot with these two dies and your scraps. You can buy more dies, but they must be 6″ wide or less to fit. It’s great for taking along to sewing days and retreats. The size makes it too limiting for me, unless I picked this up as a second cutter.

Next up is the regular GO! Cutter.

It works exactly like my cutter (see yesterday’s post) and the GO! Me. Place the die on the bed, fabric on top, and a mat on top of that, and crank it through. It comes with three dies and a cutting mat. The dies are a 2″ finished HST, 2″ finished square, and a 4″ finished square. You can use GO! dies up to ten inches wide with this system.

Next up, is the GO! Big. This one is different in that it is an electric cutter rather than manual as shown above. There is no cranking involved at all.

This will accommodate any size GO! Die. They come as large as 14″ wide. It comes with 3″ finished HST, 6″ finished QST, 6″ finished square, 3″ finished square dies.

I hope this is helpful information. I am an affiliate for Accuquilt which means that if you purchase something from them after clicking through one of my links, I make a small commission which helps to support the costs of this blog. Rest assured, I will only represent a company whose products I use and love myself.

Look for part 3 in this series coming soon. Have a great day!

Posted in Accuquilt, Uncategorized | 2 Comments

How a Die Cutter Works

I get questions from time to time about my die cutter. I decided to do a series of posts about it. This is my Accuquilt Studio cutter.

You may be more familiar with the GO! Cutter.

It is smaller, but all die cutters operate essentially the same way. Today, I’m going to show you how it works. I’ll demonstrate using this die. It has a wooden base and steel blades that are embedded into a heavy foam.

This is what it looks like from the top. You can see where the blades are and feel them if you push down on the foam.

With my studio cutter, I can cut up to ten layers of fabric at a time. I grabbed these from my scrap bucket. I place the fabric on top of the foam, making sure the blades are fully covered.

Then I place a cutting mat over top. Cutting mats need replacing from time to time, but not often. You can use both sides of it.

Next, place it on the tray of the die cutter and crank the handle. The roller puts pressure on the stack as it is rolled through, depressing the foam and exposing the blades. This is what cuts the fabric.

Ahhhh! Two perfect little stacks! So satisfying.

Look for my next post on die cutters coming soon. I’ll discuss some of the differences in the various die cutters in the Accuquilt GO! Family of cutters. Have a great day!

This post contains affiliate links.

Posted in Uncategorized | 1 Comment

Chimney Sweep Blocks

I made four of these Chimney Sweep blocks a number of years ago and then never did anything with them. I put them on my UFO list for this year.

I decided I liked this block enough to make more.

I think I’ll finally break into this FQ bundle to cut pieces for more blocks.

It would be nice to have this kitted up to take back to AZ with me.

Have a great day!

Posted in Uncategorized | 6 Comments

Window Pane Blocks

A number of years ago, I made a Quilt of Valor using this block pattern. I cut out a few more blocks one day when I was cleaning up scraps. I just found the pieces and decided to put them together.

These are the dies I used.

It makes an 8 inch finished block.

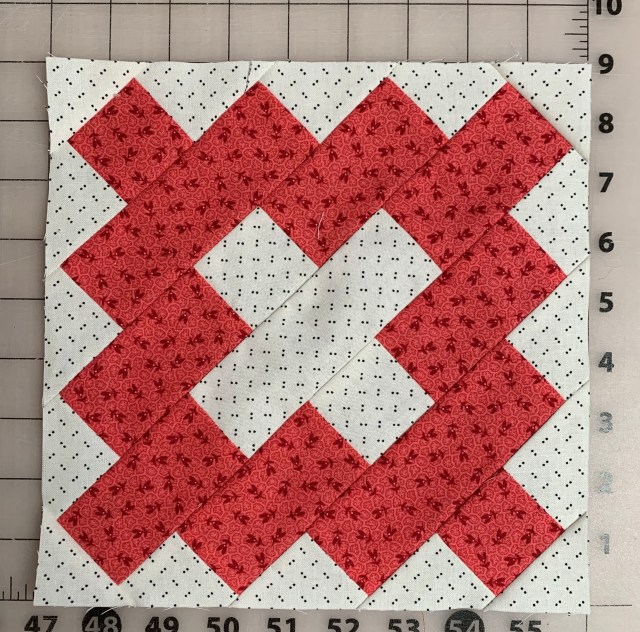
I’m keeping a block by the sewing machine so I can stitch a block here and there between other things. I only have nine cut out. When I get these done, I’ll decide if I want to make more.

Have a great day!

Posted in Uncategorized | 6 Comments

Slow Stitching Sunday ~ Change of Plans

I was thinking of using this for the doll quilt swap I’m participating in this year, but I’m just not loving it. I don’t t want to send something I’m not crazy about.

I had to stop and baste more Hexies and I made a tiny discovery.

One of the paper Hexies was significantly smaller than the others. I realized this is why I didn’t like my little quilt. It was too chunky.

Hmmm…. I decided I would start again with smaller Hexies. But first I am developing a plan for the ones I have already pieced and basted. Possibly this….

Or maybe this….

There is more to come with this experiment, for that is what this is becoming. It will require black felted wool. I’ve never worked with wool so I have some research to do.

Have a great day!

Posted in Uncategorized | 2 Comments

Bits and Pieces

I was feeling rather uninspired after the holidays, so I started casting about the sewing room for something to do. I found these. Hmmm….no idea what these are leftover from.

But I decided to stitch the HSTs together.

I don’t know what the next step is. I played with a few pieces.

I think I’ll just leave them in this dish to age a bit. Have a great day!

Posted in Uncategorized | 4 Comments

Finish It Up Friday ~ 36 Patch

This quilt turned out so much bigger than I thought!

But I couldn’t be happier with it.

It’s actually a very simple design. The quilting took forever, but it was worth it.

The backing will give an early wake up call!

The next two photos are after washing.

Of course, no bed feels fully made without at least one extra quilt.

This was my last finish for 2020. Have a great day!

Posted in Bed Quilts, Finishes 2020, UFOs, Uncategorized | 13 Comments

Pinterest Project Finish

I loved all your suggestions for what to do with my extra pieces! Thank you! My thrifty side won out and I used the extra bits. The border will got trimmed down after quilting.

I rarely do this, but I pressed the seams between rows open.

I kept the quilting simple, just eyeballed diagonal lines.

So fun to play in the scraps. Have a great day!

Posted in Civil War Repro Quilts, Finishes 2021, Small Quilts, Uncategorized | 4 Comments

UFO Parade 2021

I’m so pleased with my UFO progress last year. Let’s see if I can do it again. Here’s the current list of my UFOs.

1. I cut this Brick quilt out last year. I hope this will end up queen size.

2. This isn’t technically a UFO as I’ve never started it. But I want to finally get around to it this year.

3. Another brick quilt cut from shirts.

4. Another shirting quilt with solid cheddar diamonds.

5. Sigh. I still have these Dutch Hexies.

6. I want to finish hand quilting this vintage top.

7. EPP Hexies.

8. The languishing Leader/Ender project.

9. I pieced these four blocks ages ago and then didn’t do anything with them. Maybe this year.

Wait a minute….only 9?!? How can that be? I better go look again and update this post when I find all those that are hiding.

Have a great day!

Posted in UFOs, Uncategorized | 4 Comments